
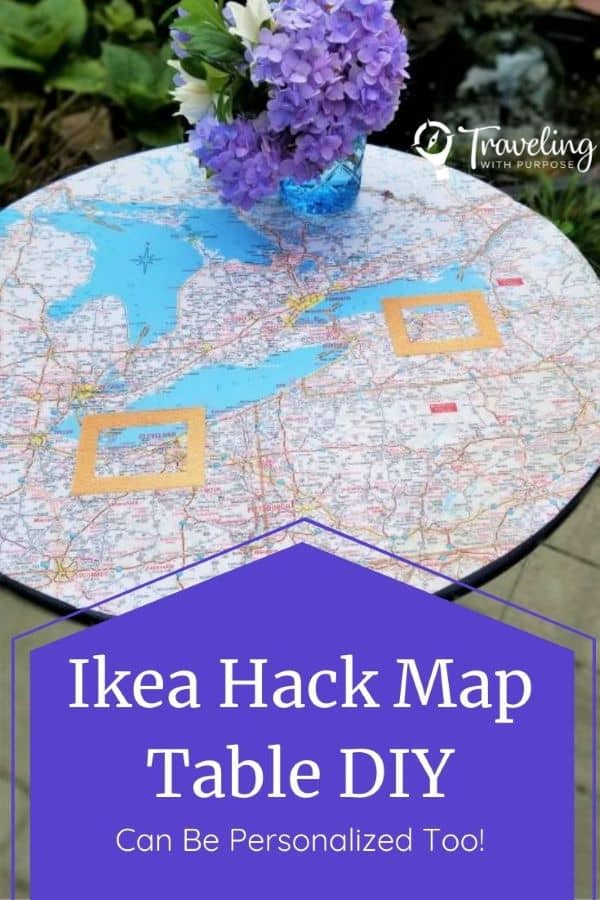
Ikea Hack Map Table DIY
The weather is starting to cool down and I was feeling creative, so I finally completed this Ikea Hack – Map Table DIY that I’ve been thinking about for months. It was either too hot, humid, or rainy to get the initial spray painting done outside during the summer. This map-covered tabletop is a great idea for any travel lover. It would make a wonderful birthday, wedding, or anniversary gift using a map of your hometown, the location where a couple was married, or just a favorite city that you visited.
You’ll be thrilled with just how simple it is. I was able to finish the map part of the Ikea hack in one afternoon. Of course, this doesn’t include the final drying time.
Ikea Hack – Lindved Side Table
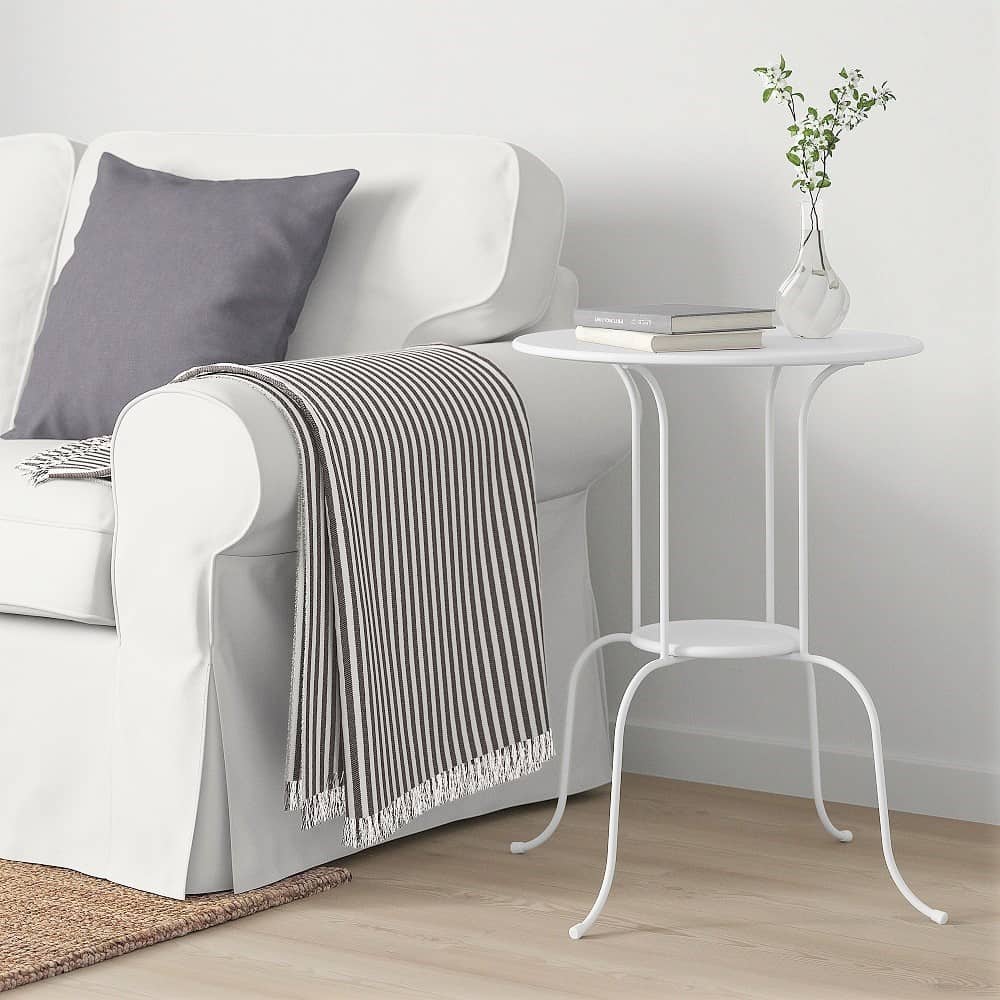
At the time of publishing this post, the Ikea Lindved Side Table cost only $25 USD (plus tax and shipping)! It’s made of lightweight steel with a powder coating for protection. They don’t show the table in an outdoor setting and don’t mention that it’s recommended for outdoors, but I’ve used mine both inside and outside over the years. You can pick one up at your local Ikea store or have it shipped to your home. It’s currently available in white. When I bought mine several years ago it was also available in a gray-blue color.
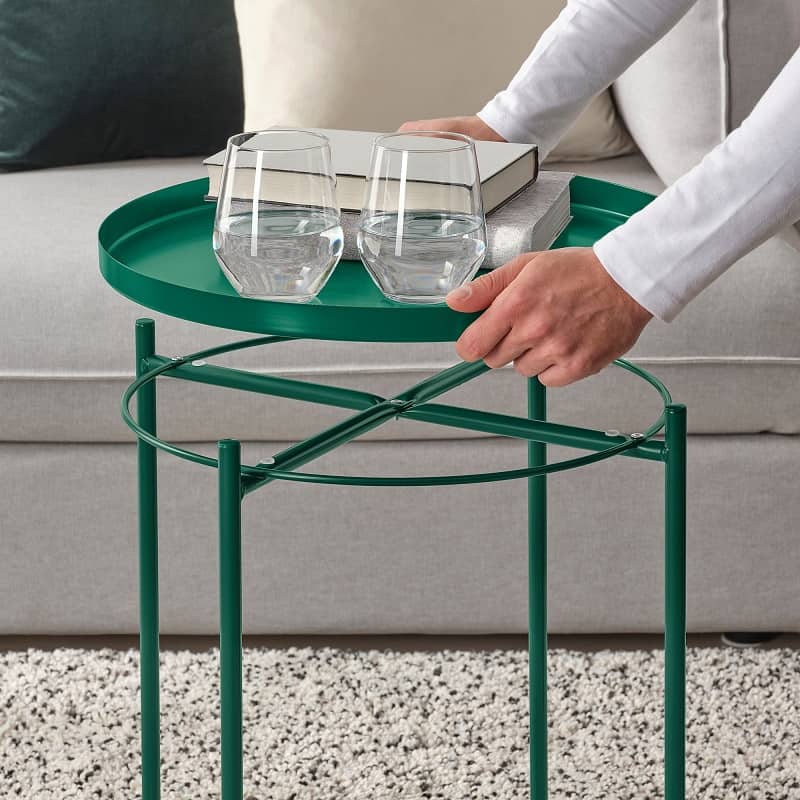
If you’ve never shopped at Ikea, you’ll find dozens of tables of all shapes and sizes at very reasonable prices. For example, this green Ikea Gladom side table (above) does double duty as a portable tray too. Four different colors are available for that one. You don’t even have to use a metal or round table.
A wooden, square, or any shape table works just as well. You could even do this on a tray, cabinet doors, or any flat surface. It just needs to be large enough to fit the map area that you want to feature. And a piece that you already have or find used is even better. Then you’ll be saving money and helping the planet by refreshing or repurposing something that might otherwise go in the trash pile.
Map Table Supplies Needed
1 – New or Used Table (or other flat surface)
1 – Map of your choice (Step 1)
1 – Scissors or X-Acto Knife (Step 3)
1 – Jar of Mod Podge Decoupage Glue (Step 7)
OR Mod Podge Ultra Spray-on Glue & Sealer
1 – 4” Paint Roller and Tray (or Paintbrush or Foam Brush)
Brayer and Plastic Squeegee, Straight Pin or Other Tools for removing bubbles (Step 7-C)
(Optional) Spray Paint (Step 5 and 6)
Frames for highlighting points of interest (Step 4) (Optional)
(Optional) Final Spray Sealer (Step 8)
1 – Select Your Map and Section to Highlight
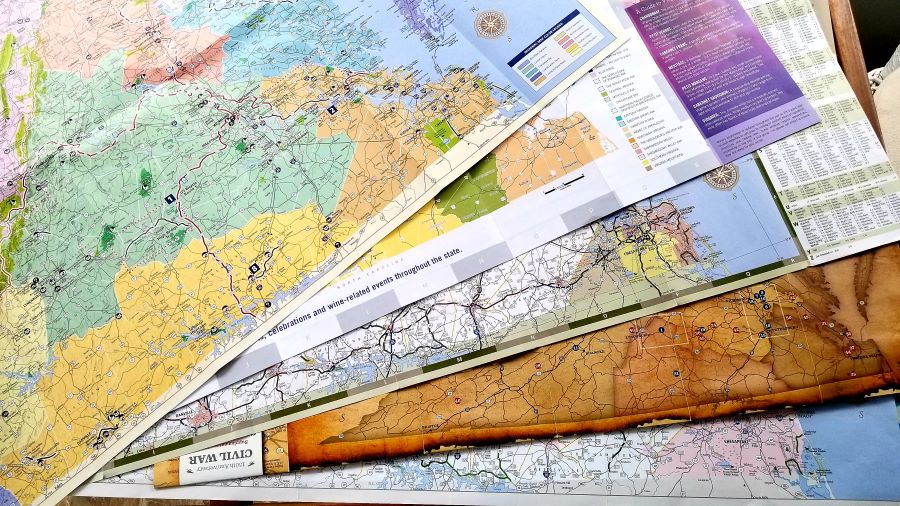
Now it’s time to choose the map that you want to use for the tabletop. As you review the maps you’ll find a wide variety of colors and styles. For example, the photo above is of the same section of the state of Virginia on 5 different maps. See the wide range of colors and styles? And this doesn’t even include the more detailed street maps or antique maps that you might find. If you’re not sure where to get maps, I did a post with many ideas on where you can find them.
Looking for free or low-cost maps? Here are some great places to look.
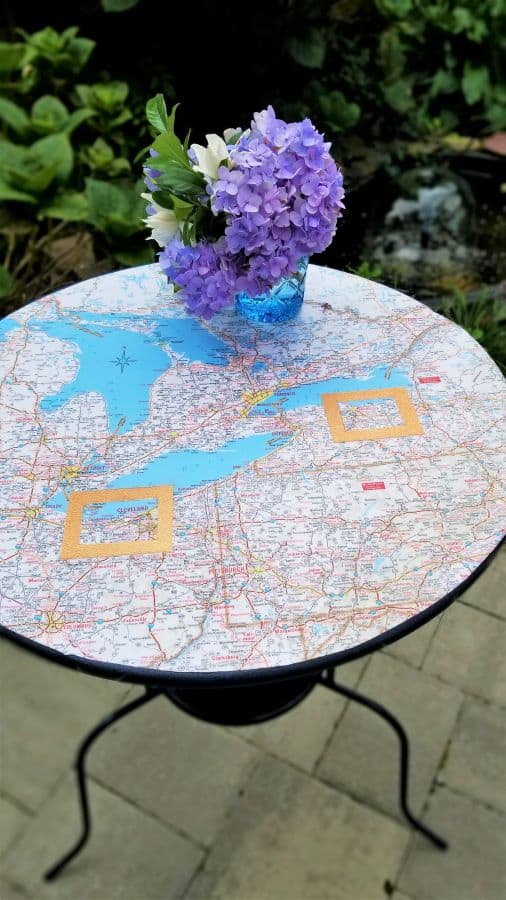
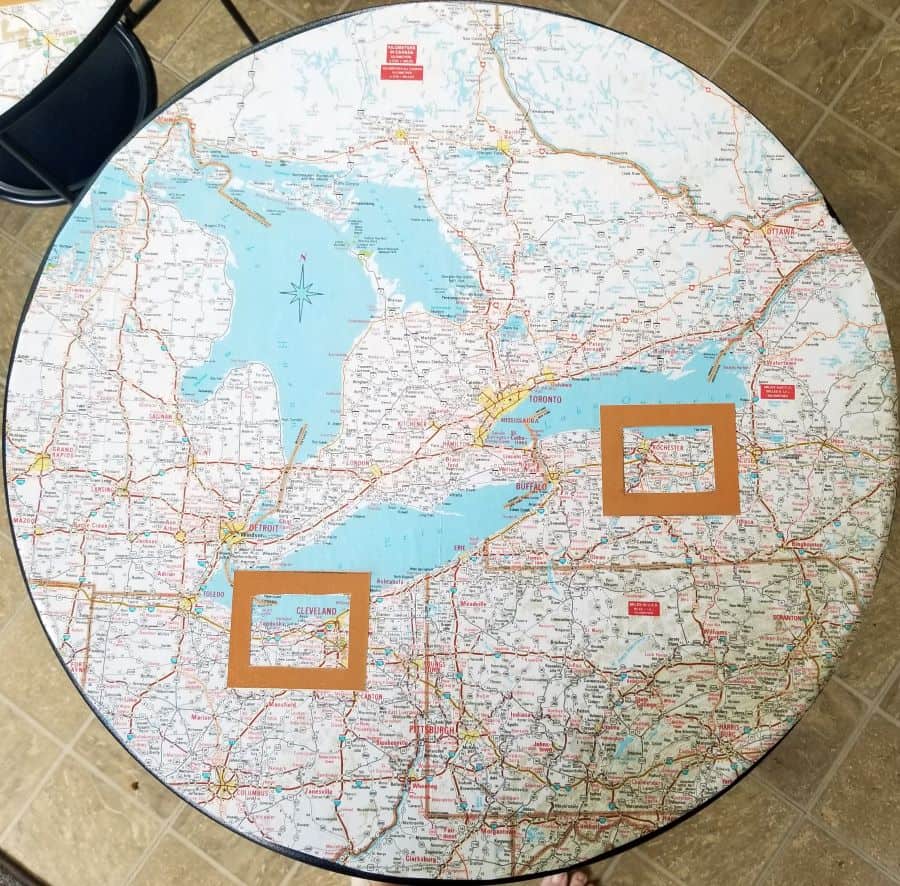
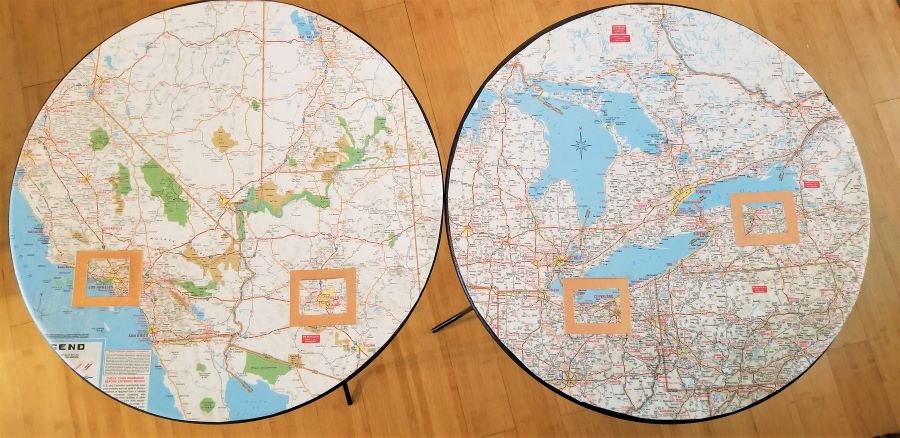
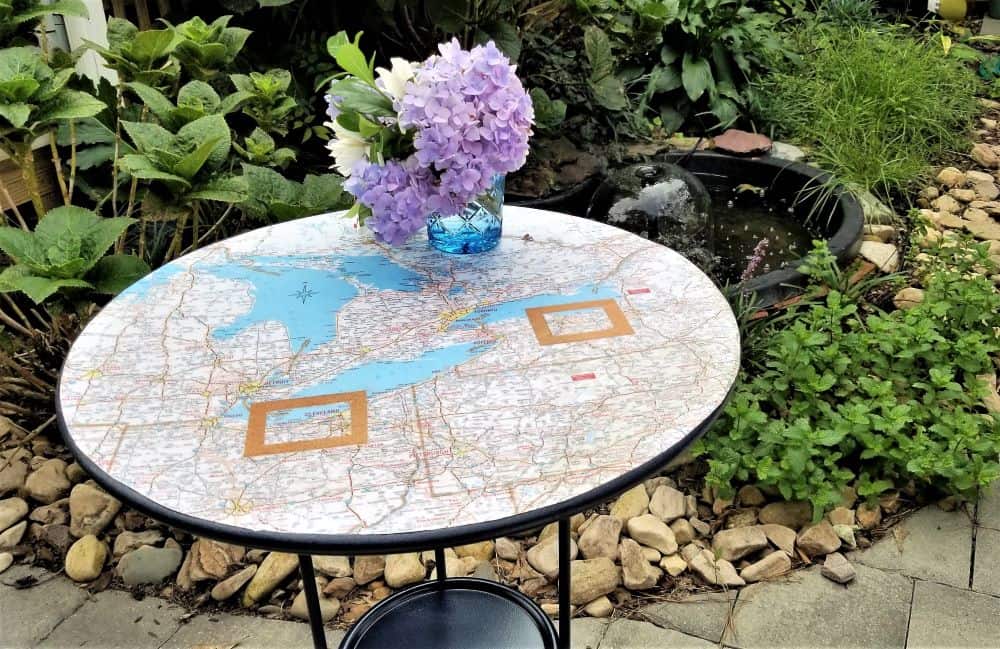
In my project, I chose two different regions. One map shows the two cities where my husband and I were born. The other shows two different cities where we have lived after we were married. Because of that, I chose regional maps that show several states in the U.S. on one map. The cool thing is that your project can be completely different. Your map could be a detailed street map, a world map, or continental map, or even a celestial map of the stars. Your options are limited only by your imagination.
I also chose to add a frame around my featured cities, which I’ll talk about later. If you want to do that, please be sure to read through all the directions first, so you can figure out your frames before you start attaching things.
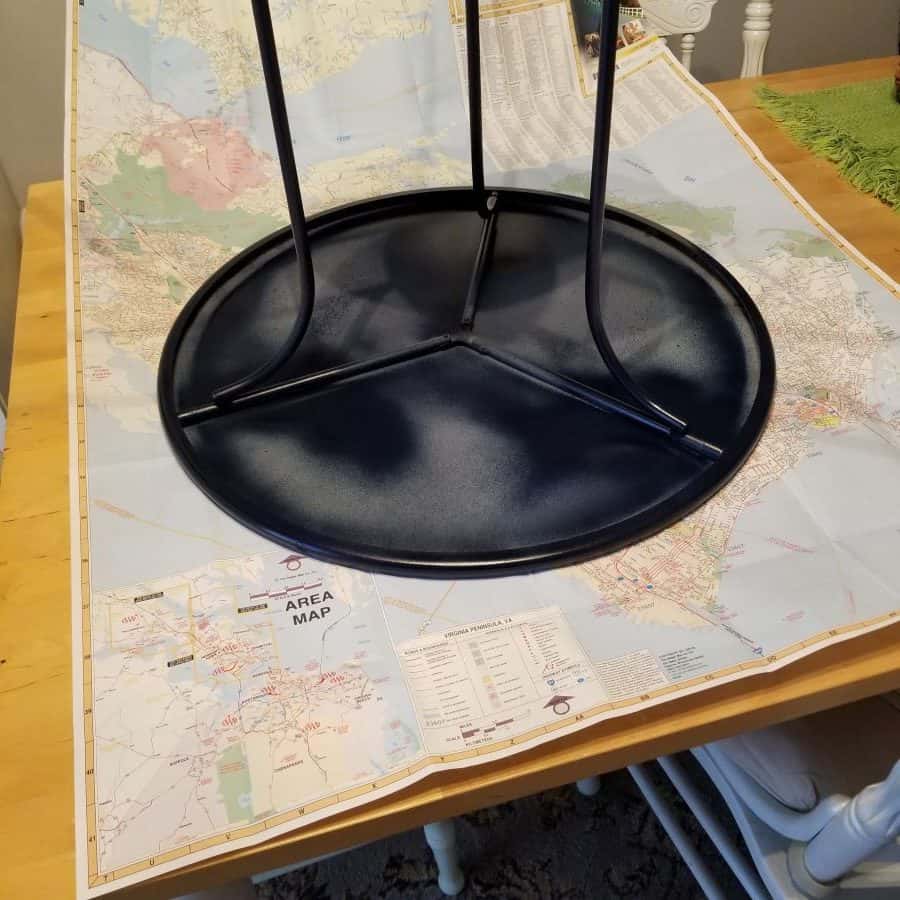
2 – Position Your Tabletop on The Map
The easiest way to determine if the map will work for your project is to turn the table upside down on the map. To see what area it covers, you can either draw a few pencil marks around the edge or stick some post-it notes at the edge to temporarily mark the perimeter. Next, lift the table to see if it covers the area that you want to highlight and if it’s centered the way you like it. Once you have your area decided, use a pencil to draw around the table.
3 – Cut Out Map Shape
My table had a rounded edge and I didn’t want the map to go over the edge, so I cut it slightly smaller than the size of the tabletop. If you plan to do this, keep it in mind when choosing your paint color, because a sliver of color will frame the map. Be sure to use sharp scissors or an X-Acto knife to get a clean edge when cutting the map.
Of course, you don’t have to cover the entire table either. You could use a square, heart shape, triangle or random shape. You could even tear the edges. It’s all up to you.
I didn’t think of this idea when I updated my tables, but you could also use Decorative Paper Edge Scissors to cut out the map. That would add even more interest. I like the edge that makes it look like a vintage photo.

4 – Create Frames For Specific Cities
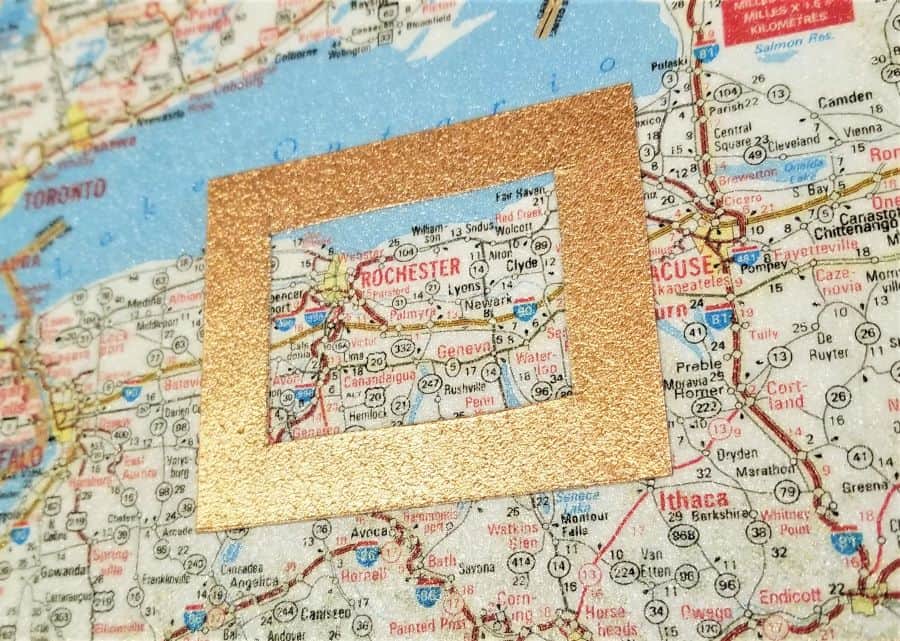
OPTIONAL – If you want to add frames around specific cities, this is when you would choose or create them, so they’ll be ready to go when you get to the attachment step. You can see in my photos that I used a square copper frame. This one shows the frame around the city of Rochester, New York USA.
The copper was a real metal super-thin sheet that I cut out from some scrapbooking supplies that I had at home. The texture you see in the pic is from rolling on the Mod Podge product. I couldn’t find the same brand of copper sheeting that I used, but I’m listing a few ideas just to get your creative juices flowing. The main requirement is that it be relatively thin so the Mod Podge glue product will attach it to the map and not leave a big bump on the table.
Ideas For City Frames
If you want to get a similar look to what I did, you can try this Metal-look Vinyl Wallpaper Roll. I suggest that you test the Mod Podge on a small piece before you do the Ikea Hack to make sure it doesn’t discolor the copper color. Then use scissors and/or an Exacto knife to cut the frame to the desired shape and size.

Ready-made paper or sticker frames of all shapes and sizes are available in the scrapbooking supplies section on Amazon or at craft stores. This one is a wedding theme, but you may find them in all sorts of scrapping supplies. Heart shapes, round frames, simple or fancy. It all depends on your preference.

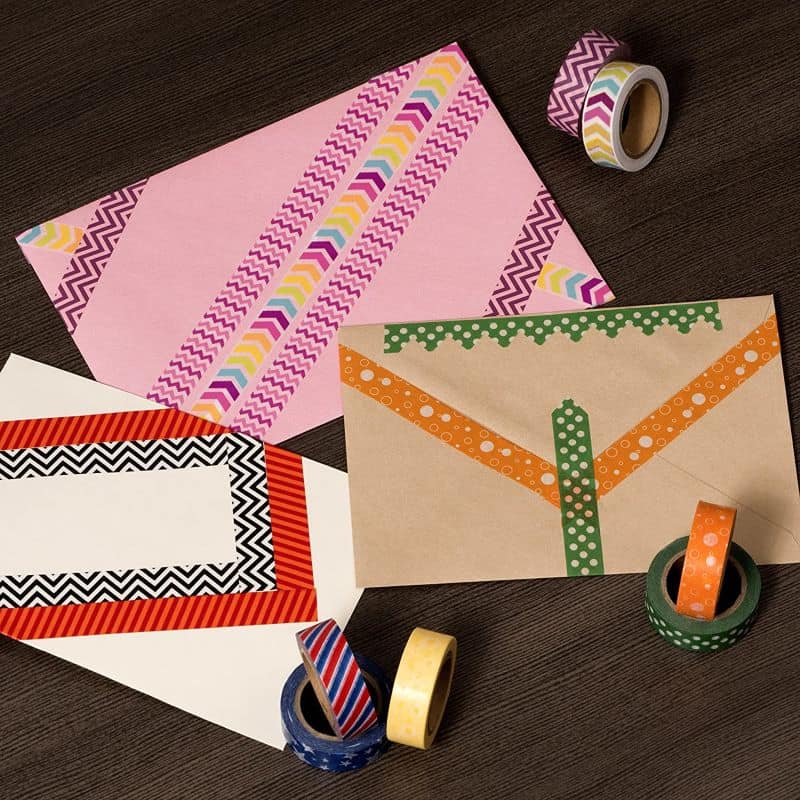
Or you could make a frame with something as simple as washi tape. I LOVE the variety of colors and patterns that you can find in these.

Whatever you choose, be sure to have it ready to go BEFORE you start the Mod Podge steps. For a frame that already has some kind of adhesive, like Washi tape, you can add the frame before going to the Mod Podge step. If you’re using a paper or other frame material, without adhesive on the back, as I did, you can mount the map onto the table (Steps 7-A, B, and C below) THEN add the frame(s) after that.
5 – Paint or Refinish Table (Optional)
If you buy a new table for this project or have something that’s in great shape, it’s not necessary to paint or refinish the table. If you’re looking to change the color, though, most surfaces can be redone. Since my tables were pretty old, they were getting a bit shabby looking. Unfortunately, I forgot to take a full photo of the table before I started.
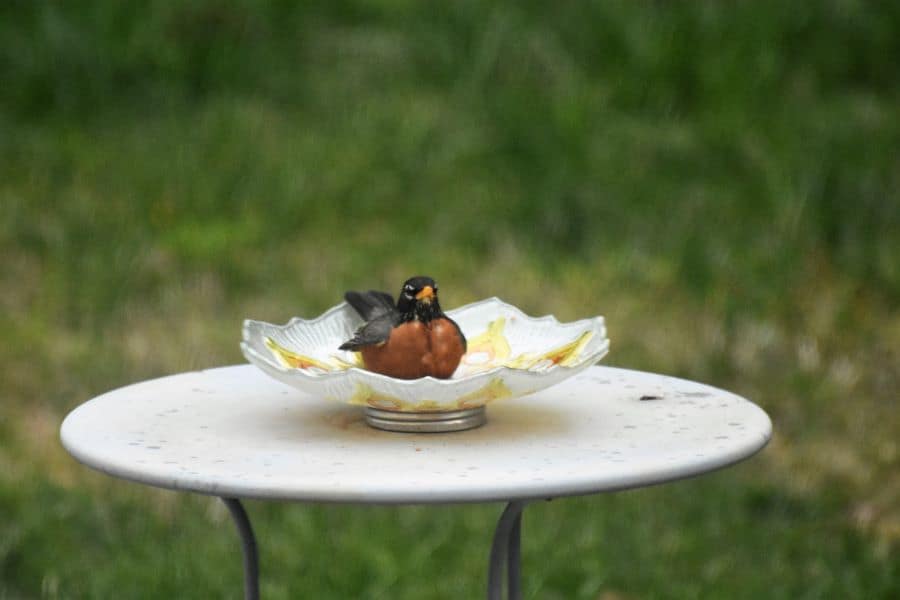
I did find this image of a robin on the table in our backyard. You can see that my table had faded to a dull gray after sitting outside for quite a while. This table is over 5 years old and I’ve used it both inside and outside. The paint faded and there were a few small spots of rust, but otherwise, structurally it held up well.
6 – Choose Your Paint Color (Optional)
Your map choice and where you plan to use the table will probably have some influence on the color that you choose for paint. You don’t want the table color to clash with the map colors or your decor, so take the map with you when buying paint.
I actually had two identical tables for my Ikea Hack. I chose to spray paint them with Rust-oleum Painter’s Touch 2X UltraCover Paint and Primer in Satin finish, Midnight Blue color. There was no need to paint the top of the table since I knew I’d be adding the maps. I only sprayed the legs, the lower shelf, and the rounded edge of each table that wasn’t going to be covered by the map.

After I spray-painted the table, I let it dry for a few days. Be sure to follow the paint manufacturers’ recommendations for application and drying time.
Once the table is prepped and ready and you’ve cut out the map to fit the shape of the tabletop, it’s time to attach it.
7 – Attach Map to Table With Decoupage
To attach the map to the tabletop I used “Mod Podge” Sealer Glue for Outdoor Use. The label says for “surfaces intended for use in sheltered outdoor environments“. There are a variety of brands that carry decoupage glue. Based on your preferences, you can choose a matte, satin, or glossy finish. There are also different products for indoor or outdoor use.

Depending on the decoupage product you use, it may require that you add a sealer when the project is finished. My tables have been drying for a few weeks and they still feel a bit tacky to the touch. The Mod Podge product above says, “Cure time: 4 weeks. Apply clear acrylic sealer over cured Mod Podge to eliminate tackiness”. When I read that it was disappointing to find out that I still had an additional step.
I used a Martha Stewart Decoupage product on other projects and there was no need to add a sealer afterward. Unfortunately, I can’t find that same product online now. Just a reminder to be sure to read your labels carefully before buying.
I also just discovered this Mod Podge Ultra spray-on product that says it’s a glue and sealer all in one. Based on the instructions, there’s no need to use a different sealer afterward. I wish I had seen this before. Oh well, live, and learn. Now you get to learn from my mistakes.

A – Roll decoupage glue on tabletop
IMPORTANT: Steps A through C should be done relatively quickly to ensure that the glue is still wet and workable while you’re trying to move the map around.
Decoupage glue can be applied with a roller, a paintbrush, or a foam brush. For this project, I wanted the tabletop to be as smooth and uniform as possible, so I chose to roll on the product. I wanted to avoid brush strokes. I used a small 4-inch roller and tray like the one below. Look for a roller intended for smooth surfaces to reduce the finished texture.

Pour a small amount of Mod Podge into the tray and roll it on the tabletop surface where the map will be placed.
B – Roll decoupage glue on the BACK of the cut-out map
Flip the cutout map over onto a clean hard surface. You can use paper towels under the map to catch any drips. I made the mistake of laying mine on an old newspaper and it picked up some of the ink from the newsprint. Fortunately, I was able to wipe it off carefully with a sponge before everything dried. Roll or brush a thin layer of Mod Podge onto the back of the map. This step should be done quickly since the map can get saturated and tear more easily. The wetter it gets, the harder it may be to move around on the table too.
C – Align map to tabletop and smooth out
After the Mod Podge is applied to both the table and the back of the map, flip the map over onto the tabletop. Try not to set the map completely down on the table and don’t press down on it until you have it centered where you want it. You should be able to lift the map to reposition quickly for the first 30 seconds, at least.
When positioning the map, make sure there are no wrinkles in it. If you see any, quickly lift the edge of the map to remove them. After you have the map in place, there may still be some small or large bubbles under it. Look at the tabletop from different angles to see the bubbles more easily.
To remove bubbles, gently use a roller or brayer or the edge of a plastic credit card to push the air from the bubble to the edge of the map. This brayer and plastic squeegee are a good option if you don’t already have those supplies. I’ve also used a soft sponge to gently push the bubbles out so as not to tear the map. If you have any small bubbles near the center of the map, you can poke them with a needle or pin then press the air out as well. The biggest issue is that you don’t want to tear the map while doing it. Remove any excess Mod Podge that is squeezed out around the edges of the map carefully with a paper towel or sponge. Allow to dry according to the package instructions. Mine said 20 to 30 minutes.

D – OPTIONAL – Place a Frame Around Your Favorite Cities
If you choose to add a frame around your favorite location and haven’t already added it to the map, now is the time to do that. You should already have the shapes ready to go. Roll a small amount of Mod Podge over the area where the frame will be, then place the frame in place. After you have it in the perfect spot, go to the next step below.
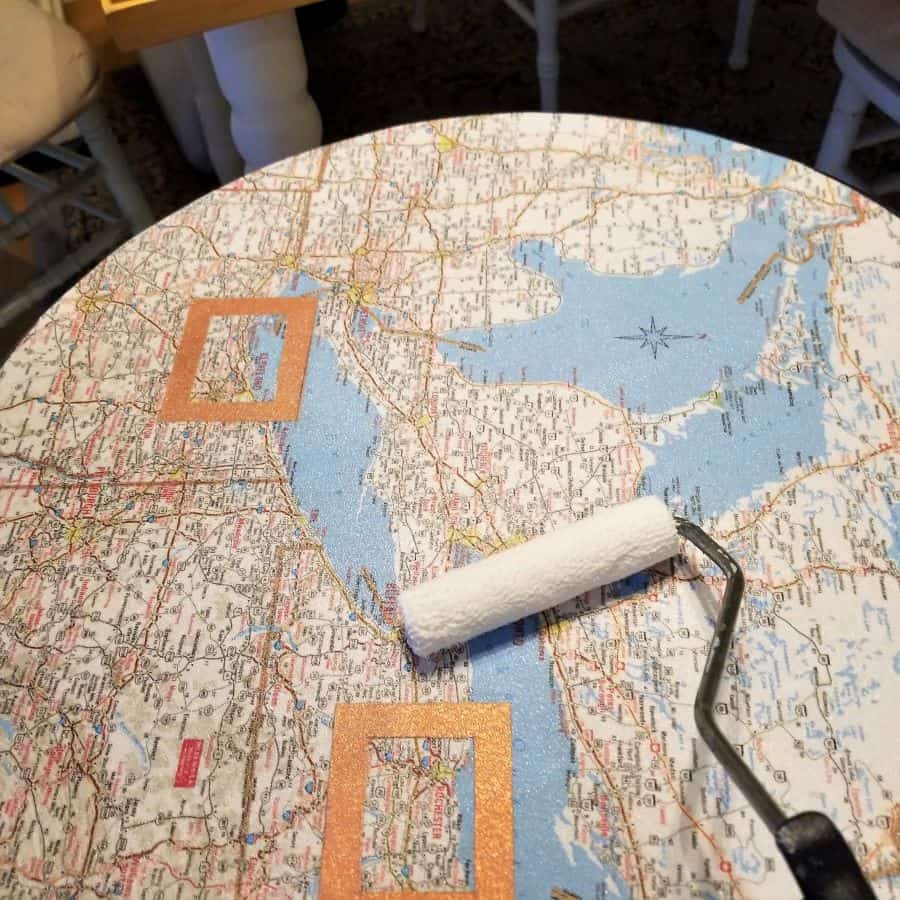
E – Roll Decoupage Glue on Top of Map to Seal
The last step for securing the map (and frames) is to roll several thin coats of Mod Podge over the entire tabletop surface to secure everything. My Mod Podge label said, “Allow to dry 20 to 30 minutes between each coat”. So, I would roll a layer, set a timer for 30 minutes, then roll the next one. I did three (3) coats on mine since I may be using it outdoors.
8 – Apply a Sealer (If Needed)
As I mentioned above, be sure to read the directions on the decoupage glue that you use. You may or may not need to add an acrylic sealer after attaching the map. In my case, I still had a tacky surface even after drying, so I ordered this Mod Podge Matte Clear Acrylic Sealer in the same brand because I didn’t want the two finishes to interact negatively with each other.

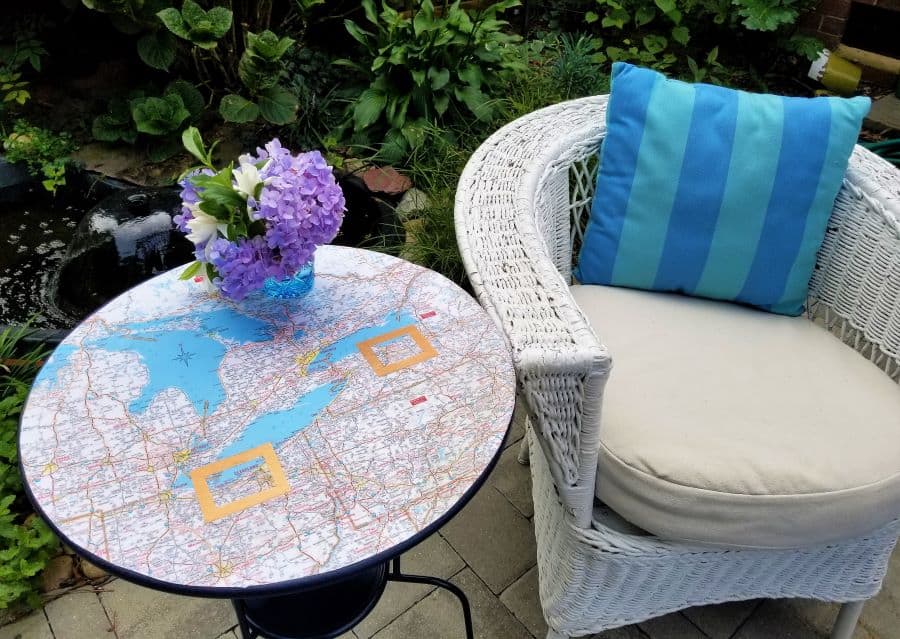
Final Results – Ikea Hack – Map Table DIY
Soo…what do you think? I’m a bit biased, of course, but I like it. I thought about adding another map to that small lower circle shelf, but realized no one would really be able to see it without getting down on their knees to look at the detail. The cool thing about this project is that the possibilities are endless. And it doesn’t even have to be maps. You can use any paper or even fabric on the tabletop. What would you use to decorate a tabletop?
Check Out These Other Fun Crafts Too
Traveling with Purpose is a reader-supported blog. In order to keep the lights on, I sometimes include links to products or services that I recommend. I may get commissions for any purchases that you make through those links, but it won’t cost you any more for the products. As an Amazon Associate, I also earn from qualifying purchases.
Category: Crafts and DIY, Gift Ideas, On the Home Front, Saving Money, Travel Inspiration, Travel-themed Crafts
Subscribe
If you enjoyed this article, subscribe to receive more just like it.


Absolutely brilliant – I have a couple of crappy old side tables I planned to throw out – now I’ll be repurposing them just like this. Thanks for sharing!
You’re so welcome, Coralie! I’d love to see a photo when you’re finished.
This is so funny…and cute…and ingenious. As someone who doesn’t like these phony posts ‘best gifts for travellers’ I even more appreciate something as creative and meaningful as this table! And it doesn’t cost that much – you only have to invest time. On the other hand, it’s time well spent since I believe that designing something this individual must be great fun…Well done, I’m thrilled!
Thanks Renata, I had been thinking about it for a long time. It was fun to personalize it just for us and add a couple of conversation pieces to our space too.